Visit us in the quaint hamlet of Myrtle Station, ON at: 9585 Baldwin St. N. (905)655-4858
(17.8km north of 401 exit 410. Look for the green house with the red roof a few doors north of the Myrtle Station railroad tracks)
Showing posts with label tutorial. Show all posts

Friday, August 2, 2024

The Knittax has landed

Last week, this lovely young man dropped off his grandmothers knitting machine. Surprise! It's a later version of the same one my mum purchased on the Kingston Road in Toronto. This was before the GO train and she passed the shop every day going to and from the city to work.

My mum worked in an accounting office on Bay Street, so I imagine she walked down from the Dundas Street bus station. During the travel time she enjoyed planning the things she would knit on the machine.

She was a beautiful hand knitter, and adored stocking stitch. When I was watching Geraldine McEwan as Miss Marple I notice she holds the yarn and needles the same way as my mum. Knit and purl row perfection, a amazing achievement I sometimes get, but not always.


I dusted the machine off and lemon oiled the cabinet. When the weather cools I'm going to take it for a spin. This photo is of another model more like my mom's. The cabinet that came with the machine is exactly the same though. Giving it some TLC sure brought back happy memories.


I'm overjoyed to find these two lovely people making super helpful YouTube video's specific to the Knittax.

Bos den Braver of Bos

Bos also has wonderful amigurumi patterns you can purchase on Etsy or Ravelry under the name Zabbez

Emily of  Emily Kate Made This 

Emily has brought back happy memories of mixing hand and machine knitting. Crochet and machine knitting too. Thanks so very much again. 

Friday, February 15, 2019

Knit Club, February 2019, the most excellent stretchy bind off

I have made several samples for the knit club meeting in February. They are in DK yarn, 42 stitches wide and 42 rows long, with a simple stripe pattern. I have 4 goals for using them; tidy up loose ends, the most stretchy bind off, mattress stitch and back stitch seaming.
The main tools for this is a number13 tapestry needle, fairly large and with a blunt point. The plastic version works perfectly for this technique.
In my system of sweater making, the first step once the work is off the needles is to measure the piece and confirm it is the measurement I expected. Then I tidy up loose ends. Darning them into the inside of the fabric, horizontally, sometimes diagonally and sometimes vertically through the back of the stitches.
Then I block, and finally sew up and add the bands. This is often the place for a stretchy bind off, aka backstitching through the loops.
Another appropriate place for the stretchy bind is a sideways knit scarf or garment. Gravity affects sideways knits and often, what seems loose enough in a cast off, over time restricts the drape of the piece. In our sample, we are doing it after the tidy. I think because I enjoy sewing as well as needlework, my habit is to work with garment pieces that are clean finished and pressed. I have noticed this also in Japanese garment making, which I have long admired. This is one of my newer reference manuals, which I purchased from The Needle Arts Bookshop in Toronto. The attention to detail fascinates me, my zen of knitting.
After I have knit the final row for example,  I knit a few rows in a sturdy contrast coloured waste yarn which matches the weight of the main yarn. I recently wrote about this method when I finished a cowl in Trinity Stitch.
One can certainly do this bind off from a knitting needle, however I have found a few rows of contrast waste knitting is a great benefit to a smooth and even tension and adds to the enjoyment of the process. Below is another photo from a vintage book in my stash. Notice the stitch being worked from right to left again.
I cut the bind off yarn 5 times the width of the piece. I have noticed a recommendation for 3 to 4 times the width, but 5 times feels much safer to me. For my sample I am using a yellow contrast yarn, but were this a garment it would be the same yarn continued from the final row of the garment.
Working from left to right, I poke the threaded needle through the fabric just below the starting point, this is to control the yarn end from jumping into the way, especially during the static filled days of winter.
Start by poking through down the second stitch and then up through the first stitch, then up the 3rd stitch and down through the second stitch and so on. You can gently stretch the knitting to see the actual stitches better. I always look for the rounded shape of the stitch purl side.
I like to have the yarn below the stitch, and it forms a nice lapped effect on the purl side. You could also have it above, it just matters that you are consistent.
Make the stitches a nice relaxed even tension. The main fabric should stay the same width, i.e not pucker or stretch.
The reverse (right) side will look like little purl bumps.
 Undo the waste yarn and admire this most stretchy and beautiful bind off.
Practice makes progress!

Friday, January 11, 2019

Bruce's Jacket is looking good.

Backstitching the main panels is now complete and for sure, always knitting the edge stitches to create a clear selvage was very helpful as endorsed by James Norbury.
I own this funky book from the 80's called Wild Knitting by Angela Jeffs . There are so many of things to appreciate about this old chestnut, the freshness of the creativity, the joy and fun in the projects and for me especially, the use of mohair, one of my most favourite yarns.
I especially appreciate the stitch dictionary at the back and the drawings so beautifully rendered. The selection of stitches all solid and enjoyable picks.

I am using the wager welt for the collar and side panels of the jacket.
How can you resist a stitch also called puzzle stitch, dispute stitch and all fools welt.
To determine the measurement of the side panels in relationship to the sleeves I lay the parts on top of Bruce's fleece jacket.
It looks pretty good to me. The next step is to knit the sleeves. I am going to start from the top and decrease towards the cuff. The top of the sleeve will have a straight area that should sew neatly into the side panel.

Saturday, December 15, 2018

Stitches I love

We have a stock of super chunky Lumio so Imade a Trinity (Popcorn )Stitch cowl.
I previously knit a narrow colourful one in the summer with an odd ball of monster yarn.
In my library I have vintage books with Trinity (popcorn) stitch patterns.
The Lumio ball band directs the knitter to use 10mm pins, but I prefer my trusty 8mm. I find, generally speaking, a smaller tension, though taking more time to knit, stands up better to wash and wear. I cast on using waste yarn, in roughly the same thickness by using a nice bright smooth turquoise cotton doubled to match the Lumio. There are alternate provisional cast on's, but for grafting I prefer a few rows of waste knitting at either end.
Once the desired length of 30 inches was achieved I stopped at pattern row 3. This was so the graft row fits smoothly in with the pattern, and is almost undetectable.
The charm of Lumio is the reflective thread, a similar material to those silvery patches on a safety vest. A great safety feature for the winter pedestrian, especially in the city.
There is a lovely program on TV Ontario called Coast. The first episodes were about the United Kingdom. The presenters wore knits and in a particular episode a chartreuse trinity stitch cowl, probably in Rowan yarn. It looked so appealing and straightforward to figure out. I have not worked Trinity stitch in many years and found the experience just delightful.

Why I Love This Stitch
What a good pattern for the practice of understanding the knitting in your hand! It is a 4 row pattern, alternating every 2 rows. The purl side is the public side, a bit jarring at first, but really helpful in supporting focus. The texture of the stitch on both sides is appealing.
Thick soft yarn and bobble stitch are great mates. After I test knit the complete pattern you will find it as a free download on our Ravelry pattern page.

Friday, May 4, 2018

Faux Afterthought Heel

This month at the guild we began the afterthought heel technique.
I first encountered this method in Elizabeth Zimmerman's 1980 book "Knitting Without Tears". Personally I don't mind cutting my knitting, however, in my experience, many people have reservations about the practice, so I used the variation where the chosen stitches for an opening are temporarily knitted with waste yarn.
This technique is also used in folk socks, where the main pattern is quite ornate. I imagine a skilled and practiced knitter works the main pattern and the heels and toes worked by a student or apprentice knitter. My friend Samu tells me that in Zimbabwe, a garment is often made by a group. Someone knits the back, another the front, another a sleeve etc. so the garment (i.e.) is produced efficiently.
There are lots and lots of people on the internet with wonderful instructions for afterthought heels, like here and here. In this post my aim is to show my lesson prep plus thoughts on the process.
First I made 12 samples, each 48 stitches wide, and 36 rows long, on my regular gauge machine using a sport weight acrylic, tension dial 10, hand fed.
At row counter 12, I hand knit 18 stitches with a piece of contrast waste yarn. This is so the knitters can practice picking up live stitches without fear of cutting the knitting. At row counter 24, I marked the centre stitch, so if the knitter is inclined to cut it is easy find the exact centre point for the snip.
Stocking stitch likes to curl, so I paired the swatches right sides together, basting them around the edges. My favourite low tech blocking approach.
Because the yarn is acrylic, I used my handy vintage tea towel, dipped in water and wrung out, laid on top of the swatches and steamed by lightly touching the wet cloth method. The swatches are small and fit on the ironing board, no problem.
Now the swatches are flat and ready for the sampling work
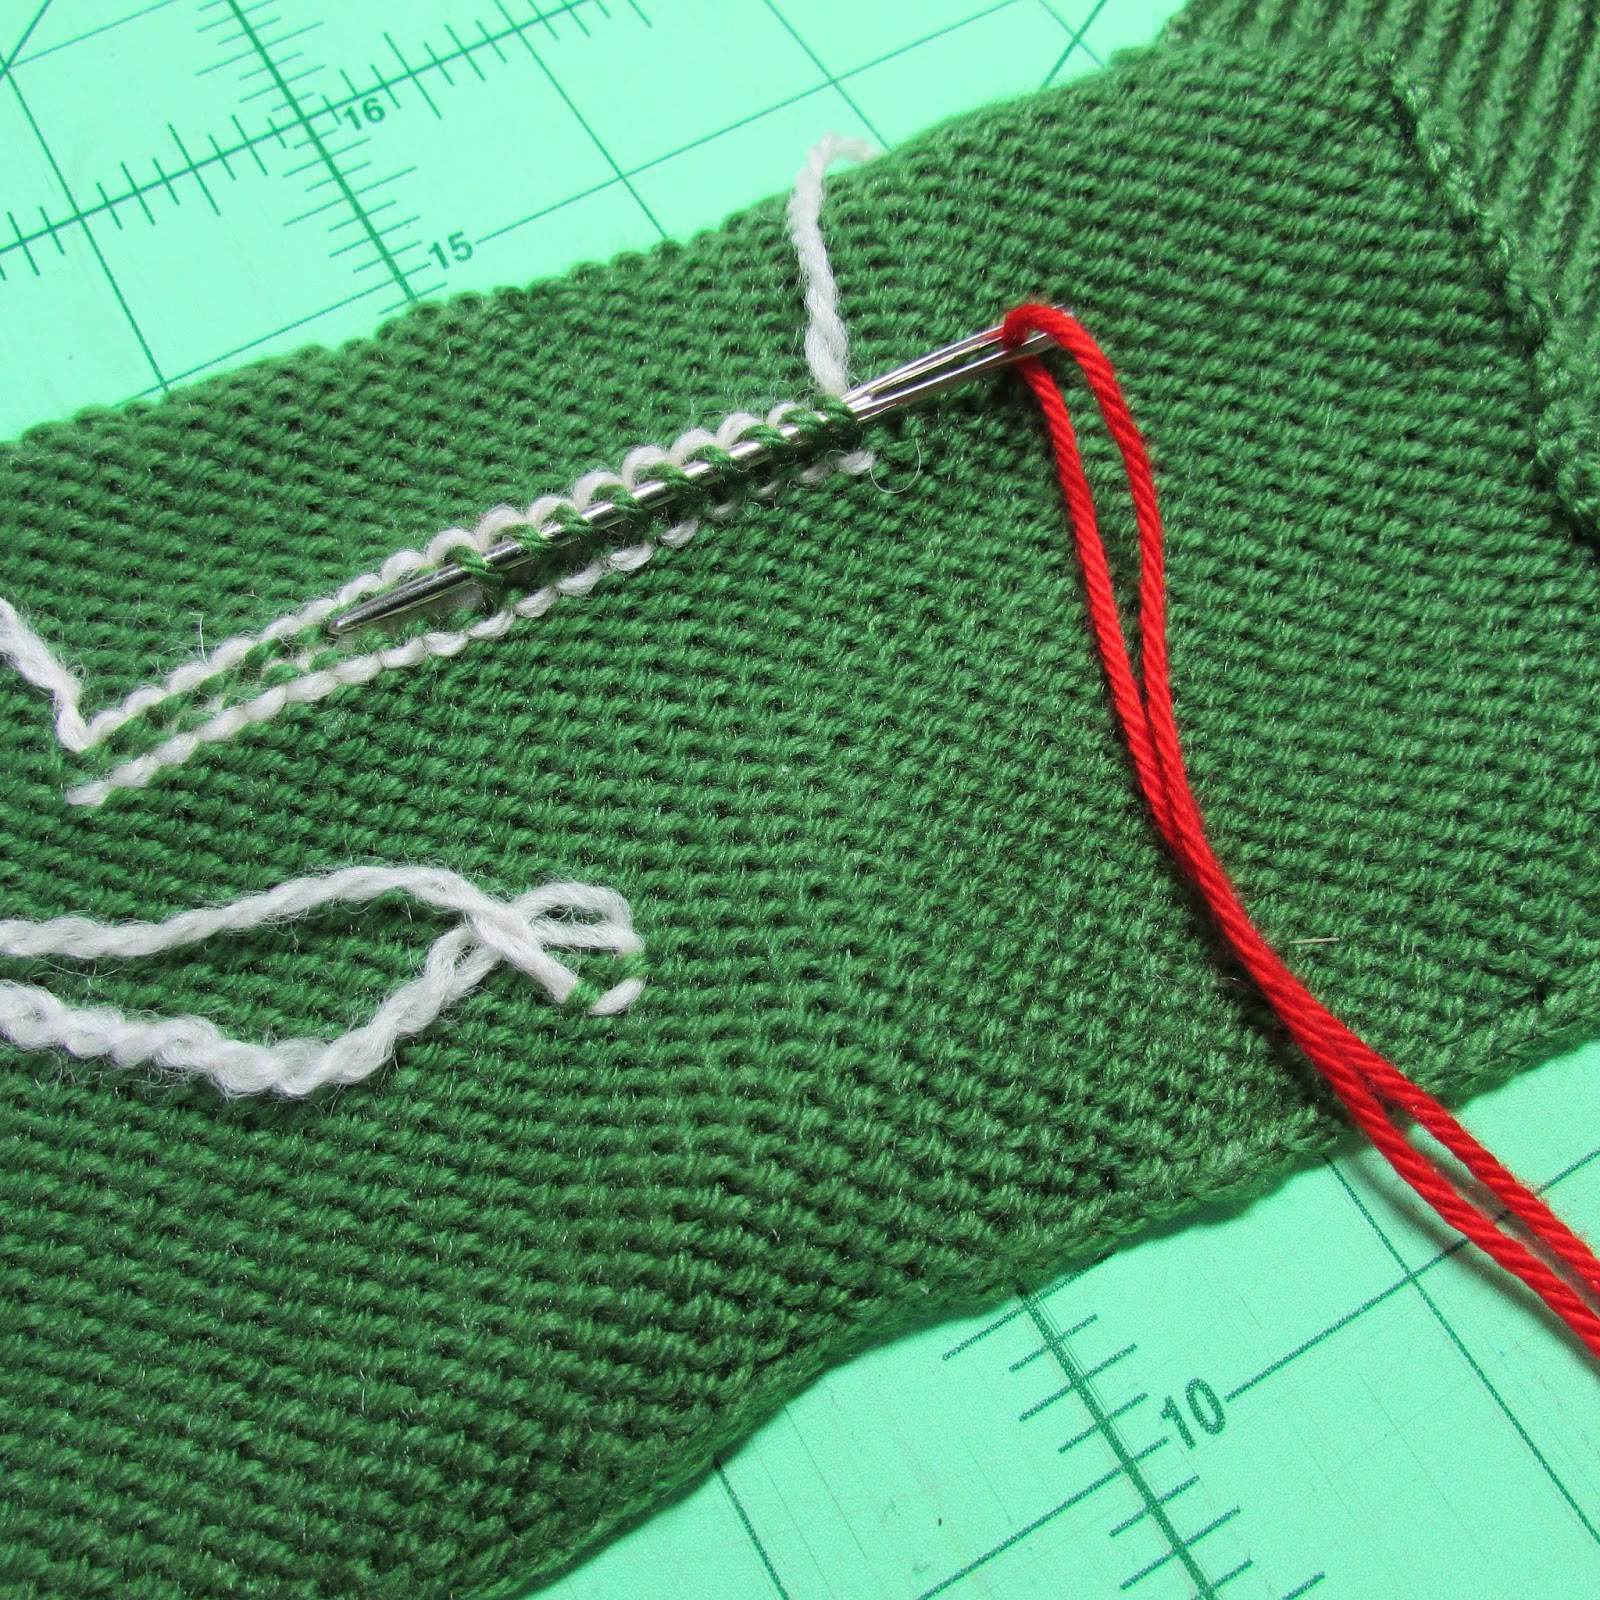
A blunt tapestry needle with a well spun piece of contrast cotton yarn makes splitting and snagging less likely.
Poke through the stitches on both sides of the waste yarn I like the purl side of the fabric, as I find the individual stitches easier to see.
Then pull out the waste yarn. Heel opening created!
Flip the piece over to the knit side and put the stitches on my sock needles.
The red yarn stays until I am sure I have picked up every stitch.
Then divide the stitches into quarters, ready for shaping, just as a regular toe shaping process.

Knit the "Toe" heel. Everyone has their favourite way of toe shaping, my practice is:
  1.  knit 2 together at the end of needle 1 
  2. knit 1 slip 1 pass the slipped stitch over, at the beginning of needle 2
  3. knit 2 together at the end of needle 3
  4. knit 1, slip 1, pass the slip stitch over at the beginning of needle 4.
I like to put a brightly coloured marker at the beginning of the round, because the number of stitches is so small and life can be so interesting that I don't notice when I pass the starting point.
When the shaping is complete and I work a final last plain round I stop at the end of needle 3, leave about 8 inches of main yarn and knit a few rounds of stocking stitch in a contrast colour.
I much prefer to work grafting from stocking stitch than off the needles, especially with such few stitches. Here is a blog post about this method.
In this photo, the yarn between the 2 middle stitches was snipped, the stitches unravelled and picked up with sock needles ready to divide for shaping, the authentic afterthought heel method.
Here are photos from one of my beloved Japanese books showing grafting from waste yarn. 
It is important to use a nice blunt tapestry needle
And a clear contrasting well spun yarn for the waste knitting. I like mercerized cotton close to the weight or slightly thicker than the main yarn.
I also use the waste yarn technique for my honeycomb mittens thumb opening as well as the armhole opening on a sideways waterfall vest or cardigan. Very handy indeed

Thursday, March 8, 2018

Blocking Practices Part 2

Here I am, blocking the very soft, kid mohair scarf I knitted using the "Wisp" pattern freely available from Knitty the free online magazine. Absolutely the opposite of my previous Debbie Bliss cable cardigan in both form and substance.
I think this is a good example of showing how to block a piece that is very soft and much larger than my blocking board. I have folded it in half.
As usual, I baste all around the double thickness edges with a running stitch using a pale, sturdy yarn, as I mentioned in Part 1.Then I place pins in the corners to mark the expected (half) measurement of the finished scarf.
I have put a dowel in the fold and anchored it behind the pins by tension and then pinned the opposite edge, then pins at the half way point on the length, then split those distances in half and so on until I have pins about 2 inches apart.
I use an ordinary iron, with steam first hovering over the scarf, pressing the button all the while, to give it the general idea. I then move closer and closer to the fabric until I am almost touching it, still making lots of steam.
By using a dowel at the fold I don't create a sharp crease at the midpoint, and can happily steam the piece to the very edges.
For a nylon/synthetic yarn, which melts and hardens when touched by an iron such as classic Sirdar Snuggly, the method varies.  I use an almost wet well worn tea towel, laying it on the piece, section by section, dipping it and wringing it out in a handy nearby bowl of water. I rather enjoy the sizzling sound it makes as I work, almost but not quite as much as I enjoy the smell of steamy pure wool.
What about wet blocking, well... for sure there is little risk to your knitting by pinning it out and spraying it with water, then leaving it to dry. The action of washing also smooths out the hand knitting fabric, especially over time. However without heat, the fabric won't have memory of the desired shape and dimensions. Think about the result of using a curling wand on hair. Further, should you wash the fabric in hot or warm water without blocking, it will take that memory, but in an unorganized manner. So by using sufficient heat, and setting parameters, and unless you wash it at a higher temperature than steam, which you are unlikely to do, the blocking memory will stay.
Extra note! Pure Cotton and Linen don't keep a hot blocked memory, the process above applies to animal and synthetic fibres. You need to remind such fibres after every wash by laying them flat to dry. A good reason to use blends like Regia Tutti Frutti . Remember when people used to iron the household linens after each wash? I have found over the years that my cotton sweaters go short and wide after washing, without exception. I now choose a size with negative ease and add 25% more length than the pattern states.